1. Apply out of Direct Sunlight
2. Clean surface thoroughly with alcohol (do not use windex as it leaves behind a film residue that can keep the decal from sticking completely)
3. Place decal on a hard smooth surface face up and rub over the decal with a credit card or squeegee firmly.
4. SLOWLY Peel off the backing away from the installation tape, if any part of the decal remains attached to the installation tape as you are peeling it away lay the tape back down on to the backing and firmly re-rub over the decal with a credit card or squeegee. Once decal is removed from the backing paper move on to next step.
5. Place the decal on the glass or other smooth surface where you want it to stick.
6. Run over the installation tape with a credit card or Squeegee working out any bubbles that may have formed while placing the decal on the surface.
7. Wait a minute or two to let the adhesive bond
8. Slowly peel off the installation tape pulling gently at a angle. (if the decal tries to stay attached to the installation tape lay the tape back down and apply heavy pressure using a credit card or squeegee}
9. Wait a few days before washing the vehicle to allow time for a good bond. DO NOT POWER WASH
10. To remove in the future, heat slightly with a hair dryer and peel.
LARGE DECALS
It is recommended for large decals and windshield decals be installed by a professional they can be time consuming and require patience to install properly to get the decal straight and without air bubbles.
Windshield Decal Installation Instructions
Applying your custom vinyl graphic is easy enough to do by yourself. The following tools are
recommended when applying vinyl decals or lettering.
Masking tape
Level
Squeegee
Pin or exacto knife (optional)
Decals are not designed to be left rolled for long periods of time. Please install your decals as quickly as possible to prevent wrinkles that may occur in the shipping process.
Cleaning Procedure
All surfaces are contaminated to some degree. To ensure good adhesion to any vehicle surface it is critical that you follow
these recommended procedures in decontaminating and preparing the surface prior to any vinyl product installation.
1. Wash and rinse the area with liquid dish detergent and warm water. Then dry the vehicle surface with a clean, lint-free
towel or cloth.
2. Finish up the cleaning process by wiping down the entire area with Isopropyl Alcohol (rubbing alcohol). To avoid recontamination during the final cleaning step, wipe the surface in just one direction, using a clean, lint-free towel or cloth. You are now ready to apply the vinyl.
Temperature Recommendations:
Surface temperatures should be between 50 and 90 degrees Fahrenheit before attempting the installation. As a general rule, if the surface is hot to the touch it’s over 90 degrees Fahrenheit. Adhesive becomes brittle when it gets too cold and gummy when it gets too hot. Applications outside the recommended range of 50 to 90 degrees Fahrenheit reduce the adhesives’ ability to perform.
Application Procedures:
The base material is vinyl. Because vinyl is a pressure-sensitive product, direct pressure to the product is
very important. Please use your thumb or a soft, non-marring tool to apply pressure such as a squeegee or credit card.
After removing the decal from the box and Prior to installation, lay the decal on a hard smooth surface and apply pressure swiping across the decal starting in the center and working your way outward to assure proper adhesion of the decal to the transfer tape and to remove any roll patterns that may be in the application tape from shipping.
Instructions
Exterior Graphic Care
Today’s finest pressure-sensitive vinyl materials have been used to create your new graphics. These graphics require little
maintenance and should be treated similarly to a painted surface.
Wash your graphics with plain soap and water or any commercially made car wash soap. Rinse thoroughly. Please wait a few days after installtion to wash to insure a good bond.
Keep high pressure nozzles at least 18 inches from the edge of the graphics. High pressure spray may cause the edge of
the graphic to peel.
Test any cleaning solution on a small section of the decal before using. Be sure to read the solution’s directions and warning notices that may apply to Vinyl Graphics.
Don’t use any aromatic solvents such as acetone, M.E.K., toluene, paint thinner, or lacquer thinner on your graphics. Any solvent may soften the vinyl material or smear colors.
Don’t apply wax over graphics. Wax products generally contain petroleum distillates, which can damage vinyl graphics.
Note about Windshield Lettering Products: There is no warranty on windshield lettering products against peeling,
wiper blade damage, ice scraper damage, or any other type of damage that may occur. While these occurrences all prove to be out of our control, rest assured that the vinyl materials used are Premium grade with a life expectancy in regard to colorfastness of 5-7 years.
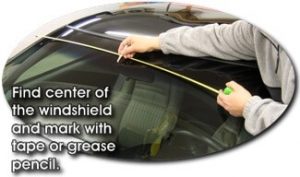
Step 1
After thoroughly cleaning the windshield surface, find and mark
it’s center with a small piece of tape or white grease pencil. Take
care not to use the Rear View Mirror mount for reference as not
all mirrors are placed at exact windshield center.

Step 2
Locate and mark center of the Windshield Decal. Center can
easily be found by folding the decal lengthwise in two . The
resulting crease is center.
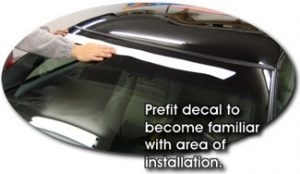
Step 3
Once centers are found, place decal onto windshield so as to
become familiar with desired placement.

Step 4
Recommended method of installation is the Center Hinge. This
is achieved by carefully removing a 2-3″ portion of the backing
paper from the center as shown.
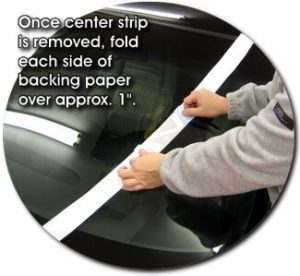
Step 5
Once a portion of the center is removed, simply fold back each
side of the backing paper approximately 1″ (25.4mm) onto itself.
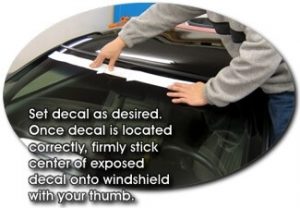
Step 6
Then, turn the decal over and carefully set it in the desired
location, making sure it’s centered. When placed correctly, stick
the center exposed area down with your thumb.
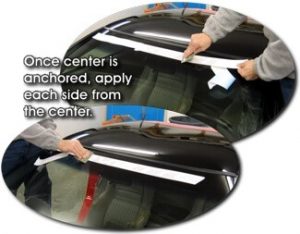
Step 7
Once “hinged”, apply each side of the decal from the center with
an application squeegee or soft non-marring tool.
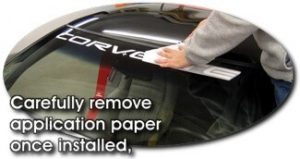
Step 8
To remove the application tape, peel SLOWLY at a sharp (180°)
angle. If the vinyl appears to be lifting, gently push the
application tape in the opposite direction from which you were
pulling and re-squeegee that area. If after removing the
application tape, air bubbles are apparent, puncture the vinyl
with a pin or needle (DO NOT USE a knife or razor blade) and
squeegee out the air towards the puncture.
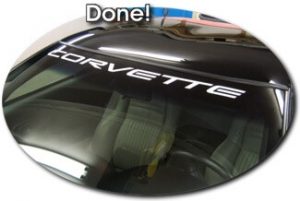
Step 9
Step back and ADMIRE!